How to Update, Modify or Rebuild the Windows 10 Search Index
We have all used the Windows 10 search box at some point or another to look for that digital needle in a haystack. The latest version integrates more with the Internet and provides a more advanced and easier-to-manage interface that lets users filter their files by type or even search for files stored on cloud services such as OneDrive. When Windows 10 Search is working properly, you can open the start menu and start typing, and you’ll start to see relevant results immediately:
If your files aren’t showing up like you’d expect them to, there are a couple of different things you can try.
Run the Search and Indexing Troubleshooter
The first thing you can do is run the Search and Indexing troubleshooter to see if it can help fix what might be preventing your search results from working. Open Start > Settings > Update & security > Troubleshoot. Scroll down, select Search and Indexing, click Run the troubleshooter, complete the wizard, then restart. Then check to see if your search queries work.
Restart the Search UI Process
Another thing you can try doing is ending the Search UI process in Task Manager, then restarting your computer. Press Windows key + X, click Task Manager, Processes tab, select Search then click End task. Restart your computer then check to see if the search works again.
Rebuild the Windows 10 Search Index
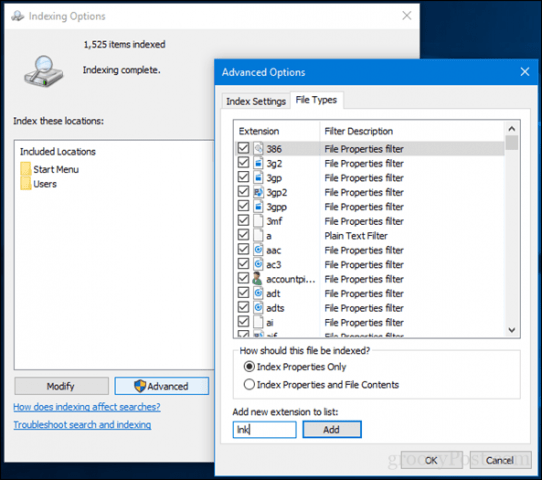
Microsoft made some modifications to how Search and Indexing work in Windows 10. Windows 10 seems to disable Search Index when it’s not in use to improve battery life and performance. This can sometimes make it seem like your files don’t exist when you decide to perform a quick search. To fix this, restore some of the old capabilities, launch the classic Control Panel, and then open Indexing Options.
Click the Advanced button, select File Types tab, then type lnk in the Add new extension to list box, click Add then click OK. What this will do is trigger Search and Indexing to rebuild the index.
Add Drives to Windows 10 Search
If you want to add drives to Windows 10 search—for example, a non-system data partition or an external hard drive or SD card—you can do so from the same Indexing Options panel as above. Open the classic Control Panel and click Indexing Options. Next, click the Modify button, then choose the drives you want to add or subfolders within the drive. I recommend you don’t add everything, just the most common locations where you keep important files that you might need to reference. In my case, I keep files stored in the Public folder on another partition, so I’m going to add that. Click OK when you have added all the folders you need.
So, what exactly have we done? We made Search and Indexing work just like it did in the old days, where it constantly monitors folders and updates them when changes have been made. You probably don’t want to do this on every device since this will use more of your PC’s resources, but for desktop PCs or devices always plugged in, it can be advantageous, especially when you have multiple drives and partitions. Give these Windows 10 Search Index tweaks a try, and let us know how it works for you. Comment Name * Email *
Δ Save my name and email and send me emails as new comments are made to this post.
![]()


