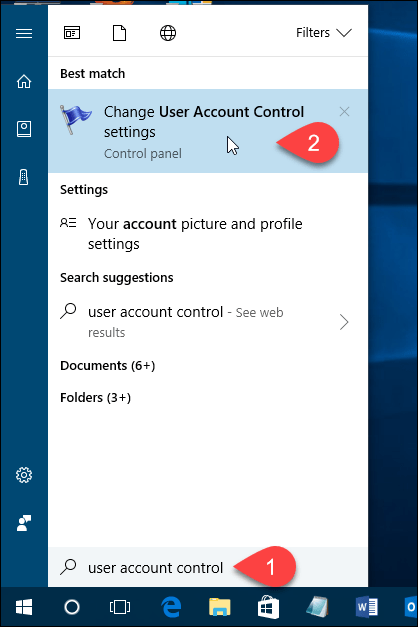
Accessing UAC is slightly different in Windows 7, 8, and 10. However, today we’ll show you a straightforward way that is common to all three Windows versions. We used Windows 10 in our example, but the procedure works the same way in Windows 7 and 8. Hit the Windows key and start typing “user account control.” Search results start to display as you type. When you see the Change User Account Control settings Control panel option under Best match, click on that.
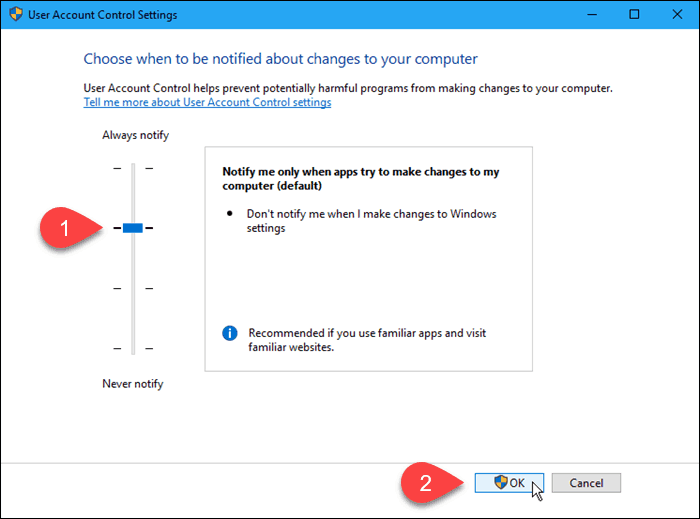
You can disable UAC by moving the slider down to Never notify. However, we don’t recommend that. It’s there for a reason, and your PC will be less secure with UAC disabled. The Always notify option at the top causes Windows always to ask you to verify whenever you install a program that makes changes to your PC or when you make changes to Windows settings. The UAC dialog box will always display on a dimmed desktop. The middle two settings on the slider are similar. They both only notify you with the UAC dialog box when programs try to make changes to your PC, but not when you change Windows settings. The difference between the two settings is that the higher one dims your screen during the notification and the lower one doesn’t. When the screen is dimmed, you can’t access anything else but the UAC prompt. You can access your desktop and do other things without dimming before responding to the UAC prompt. Click OK once you’ve made your selection.
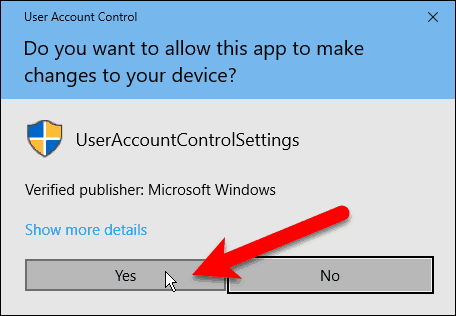
The User Account Control dialog box displays at the previous compression level. The level you just chose will take effect the next time you do something that requires verification to make changes to your PC.
You can temporarily disable UAC if you’re installing several trusted programs in one sitting. However, remember to enable UAC again to get the extra security protection is provided. Which UAC setting do you use most of the time? Have you found UAC helpful or annoying? Please share your thoughts and experiences with us in the comments. Gosh I’ve hated that popup thingy so much! Comment Name * Email *
Δ Save my name and email and send me emails as new comments are made to this post.


![]()
title: “How To Disable Or Modify The User Account Control Uac Settings In Windows” ShowToc: true date: “2022-12-03” author: “Matthew Warren”
Accessing UAC is slightly different in Windows 7, 8, and 10. However, today we’ll show you a straightforward way that is common to all three Windows versions. We used Windows 10 in our example, but the procedure works the same way in Windows 7 and 8. Hit the Windows key and start typing “user account control.” Search results start to display as you type. When you see the Change User Account Control settings Control panel option under Best match, click on that.
You can disable UAC by moving the slider down to Never notify. However, we don’t recommend that. It’s there for a reason, and your PC will be less secure with UAC disabled. The Always notify option at the top causes Windows always to ask you to verify whenever you install a program that makes changes to your PC or when you make changes to Windows settings. The UAC dialog box will always display on a dimmed desktop. The middle two settings on the slider are similar. They both only notify you with the UAC dialog box when programs try to make changes to your PC, but not when you change Windows settings. The difference between the two settings is that the higher one dims your screen during the notification and the lower one doesn’t. When the screen is dimmed, you can’t access anything else but the UAC prompt. You can access your desktop and do other things without dimming before responding to the UAC prompt. Click OK once you’ve made your selection.
The User Account Control dialog box displays at the previous compression level. The level you just chose will take effect the next time you do something that requires verification to make changes to your PC.
You can temporarily disable UAC if you’re installing several trusted programs in one sitting. However, remember to enable UAC again to get the extra security protection is provided. Which UAC setting do you use most of the time? Have you found UAC helpful or annoying? Please share your thoughts and experiences with us in the comments. Gosh I’ve hated that popup thingy so much! Comment Name * Email *
Δ Save my name and email and send me emails as new comments are made to this post.
![]()
title: “How To Disable Or Modify The User Account Control Uac Settings In Windows” ShowToc: true date: “2022-10-22” author: “Eugene Lane”
Accessing UAC is slightly different in Windows 7, 8, and 10. However, today we’ll show you a straightforward way that is common to all three Windows versions. We used Windows 10 in our example, but the procedure works the same way in Windows 7 and 8. Hit the Windows key and start typing “user account control.” Search results start to display as you type. When you see the Change User Account Control settings Control panel option under Best match, click on that.
You can disable UAC by moving the slider down to Never notify. However, we don’t recommend that. It’s there for a reason, and your PC will be less secure with UAC disabled. The Always notify option at the top causes Windows always to ask you to verify whenever you install a program that makes changes to your PC or when you make changes to Windows settings. The UAC dialog box will always display on a dimmed desktop. The middle two settings on the slider are similar. They both only notify you with the UAC dialog box when programs try to make changes to your PC, but not when you change Windows settings. The difference between the two settings is that the higher one dims your screen during the notification and the lower one doesn’t. When the screen is dimmed, you can’t access anything else but the UAC prompt. You can access your desktop and do other things without dimming before responding to the UAC prompt. Click OK once you’ve made your selection.
The User Account Control dialog box displays at the previous compression level. The level you just chose will take effect the next time you do something that requires verification to make changes to your PC.
You can temporarily disable UAC if you’re installing several trusted programs in one sitting. However, remember to enable UAC again to get the extra security protection is provided. Which UAC setting do you use most of the time? Have you found UAC helpful or annoying? Please share your thoughts and experiences with us in the comments. Gosh I’ve hated that popup thingy so much! Comment Name * Email *
Δ Save my name and email and send me emails as new comments are made to this post.
![]()
title: “How To Disable Or Modify The User Account Control Uac Settings In Windows” ShowToc: true date: “2022-10-21” author: “Jamie Smith”
Accessing UAC is slightly different in Windows 7, 8, and 10. However, today we’ll show you a straightforward way that is common to all three Windows versions. We used Windows 10 in our example, but the procedure works the same way in Windows 7 and 8. Hit the Windows key and start typing “user account control.” Search results start to display as you type. When you see the Change User Account Control settings Control panel option under Best match, click on that.
You can disable UAC by moving the slider down to Never notify. However, we don’t recommend that. It’s there for a reason, and your PC will be less secure with UAC disabled. The Always notify option at the top causes Windows always to ask you to verify whenever you install a program that makes changes to your PC or when you make changes to Windows settings. The UAC dialog box will always display on a dimmed desktop. The middle two settings on the slider are similar. They both only notify you with the UAC dialog box when programs try to make changes to your PC, but not when you change Windows settings. The difference between the two settings is that the higher one dims your screen during the notification and the lower one doesn’t. When the screen is dimmed, you can’t access anything else but the UAC prompt. You can access your desktop and do other things without dimming before responding to the UAC prompt. Click OK once you’ve made your selection.
The User Account Control dialog box displays at the previous compression level. The level you just chose will take effect the next time you do something that requires verification to make changes to your PC.
You can temporarily disable UAC if you’re installing several trusted programs in one sitting. However, remember to enable UAC again to get the extra security protection is provided. Which UAC setting do you use most of the time? Have you found UAC helpful or annoying? Please share your thoughts and experiences with us in the comments. Gosh I’ve hated that popup thingy so much! Comment Name * Email *
Δ Save my name and email and send me emails as new comments are made to this post.
![]()
