Here I’ll take a look at creating booklets. Booklets can be useful in many situations, whether you’re doing a presentation or just printing out menus for a dinner party. No matter what the reason might be, creating them with Microsoft Word 2013 is simple.
Create Booklets in Word 2013
Update: This was written for Office 2013 which is an old version of the app in Microsoft 365 (formerly O365). For an updated version, check out our article on creating booklets with Office 2016. First of all, you’ll need to prepare a few things. Start Microsoft Word 2013 and open the blank document, which will become your booklet. On top of the Ribbon, click File.
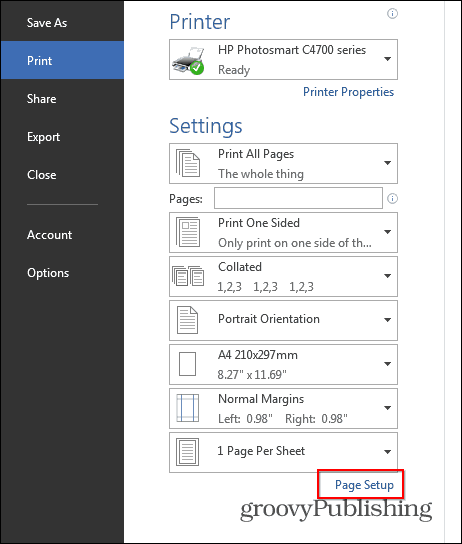
Next, in the menu that opens, click the Print button.
A set of options for your printer will come up. Go to Page Setup – it’s at the bottom of the list of printer options.
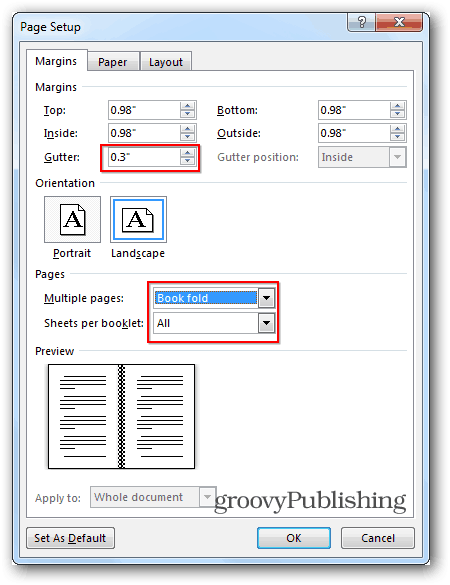
A small window will appear, just like the one below. In the Pages section, select Book fold in the Multiple pages section. Underneath it, have Sheets per booklet set to All. Last but not least, set the Gutter to the size you want. The gutter is the distance between your content and they are where you will fold your booklet. Once you’re done with these settings, click OK.
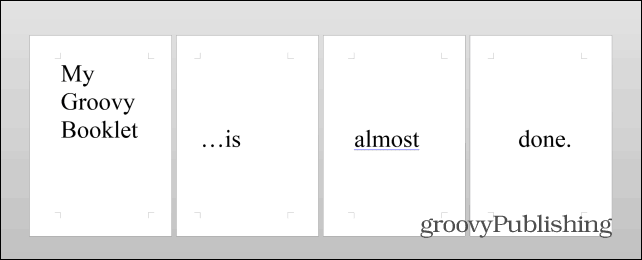
Next, create the booklet itself. As opposed to the old days of Word 2010, when you had to make sure you had the pages right yourself, Word 2013 will arrange them for you. That’s why I can paste or write my content in as seen below, and Word 2013 will make sure things are as needed. This is a great new feature that’s not only handy but saves time.
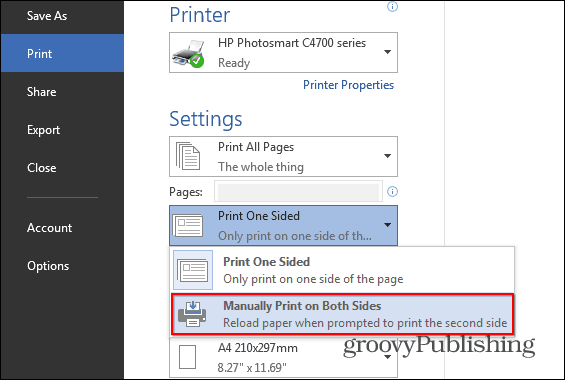
Once the content’s prepared, there’s one more essential step to go through. Click File, then Print again and, if your printer can print on both sides, print out your booklet. If it doesn’t, Then select Print One-Sided under Pages and select Manually Print on Both Sides.
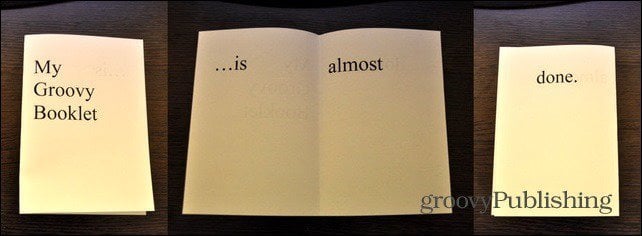
If you’ve done everything according to the instructions, you should end up with something like this, but I imagine your content will be more complicated and much more meaningful.
If you’re looking at making professional and stylish brochures or other booklet types, check out Microsoft’s free templates. If you have any questions or have some tips or tricks to create booklets, leave a comment below. Thanks! I had to add an extra step to the printing part, reverse the order of the first half of the print-job by hand then reinsert the pages into the printer for the second half. I am trying to do a booklet for a jewish ceremony, including hebrew text, and following the hebrew way of books! Select ‘reverse book fold’ instead of ‘book fold’ for Multiple Pages on the Page Setup box. Best Regards, Thank you Nice talking to you again. I see your point and tried to do that by non-friendly and complicated enaugh way. I had spent unnesessary a lot of time because of microsoft flaw with this thing in Word 13. Unfortunatelly my suggestion to MS to fix the problem is still unnanswered. Anyway thank you very much for your concern and willing to resolve the problem. Thank you again! That’s great. Glad we could help LB! -S Comment Name * Email *
Δ Save my name and email and send me emails as new comments are made to this post.


![]()
