Windows allows you to mount and burn ISOs in Windows directly, and you should be able to use Windows built-in file management features to do the same with IMG files, too. Some third-party apps, however, require you to use ISO files over IMG, especially if your IMG file is compressed. If you need to convert IMG to ISO on Windows 10, here’s what you’ll need to do.
Choosing an IMG to ISO Conversion Tool
A number of third-party tools exist for converting IMG files to ISO. These include paid-for tools as well as free and open source alternatives. Among the number of free tools available is IMG to ISO, a simple tool for switching non-compressed IMG files to the ISO format. Other alternatives include OSFMount, a free and powerful tool for mounting and converting disk files on Windows. You can also use 7-Zip to extract the contents of an IMG file and add them to a new ISO archive file manually. While this route may take longer, 7-Zip is a well-known and respected tool that will get the job done. In some cases, you may also be able to change the file extension of an IMG file to ISO. This only works, however, in cases where the file structure is identical to an ISO file. If the file is compressed, for instance, you may corrupt your file by doing this.
How to Convert IMG to ISO on Windows 10
While there are plenty of options for converting IMG files to ISO on Windows 10, we suggest using OSFMount to do so. It’s free, offers support for many image file types, and receives regular updates, making it a good option for beginners. To start, download the OSFMount installer from the OSFMount website and install the software.
Mounting the IMG File in OSFMount
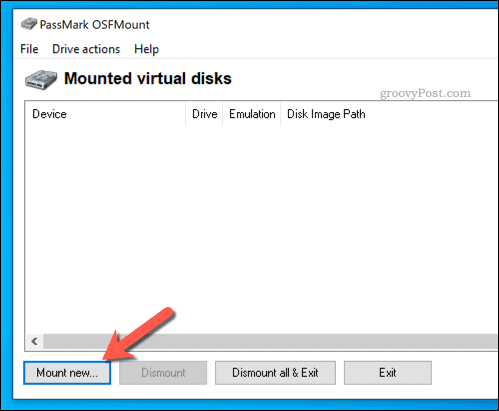
Once installed, open OSFMount and press the Mount new button in the bottom left. Alternatively, press File > Mount new virtual disk or press the Alt + N keys on your keyboard.
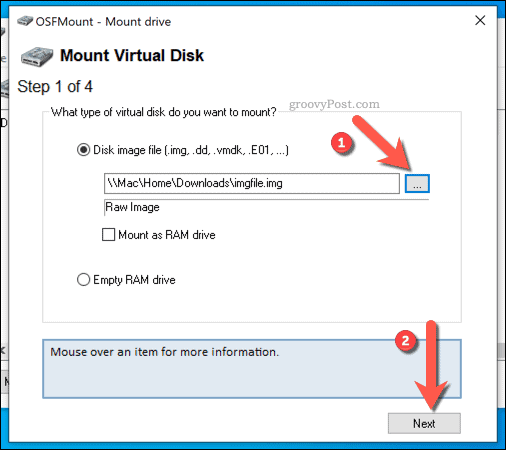
In the Mount Virtual Disk menu, select the IMG file you’re looking to convert by pressing the Open button. Use the built-in File Explorer window to locate the file, then press Next to continue.
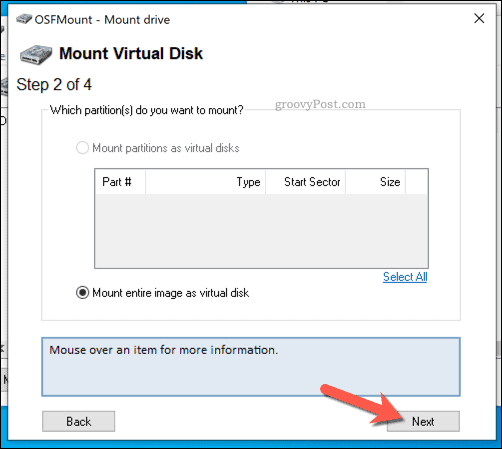
At the partition selection menu, accept the pre-selected options to mount your file. In most cases, this will be set to Mount entire image as virtual disk. Press Next to continue.
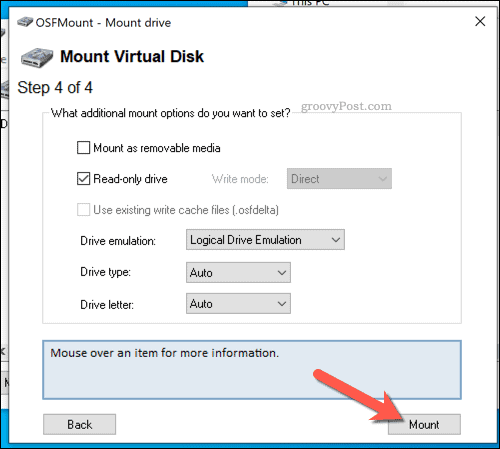
At the final mount options menu, leave the preselected options intact. You can, however, select a custom drive letter or type, or uncheck the Read-only drive to allow you to make changes to your file after mounting it. Click Mount to mount the file once you’re done.
Converting IMG to ISO in OSFMount
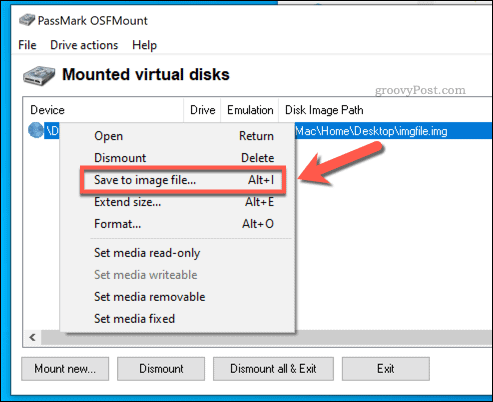
Once you’ve mounted the file in OSFMount, it’ll become accessible as a virtual drive in Windows File Explorer and elsewhere. The next step is to convert this mounted IMG file to the ISO format. To do this, right-click the mounted drive in the main OSFMount window. From the menu, select the Save to image file option or press Alt + I instead.
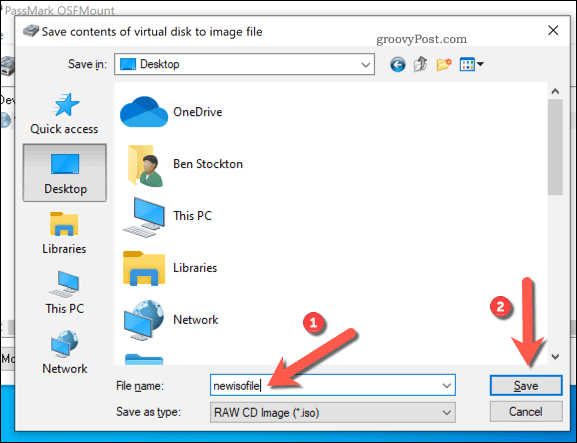
In the Save window, locate where you’d like to save the file and insert a new filename in the File name box. When you’re ready to save the file, press the Save button.
Allow some time for OSFMount to save the mounted drive as an ISO file. Once this process is complete, the converted file will be available for you to use in the save location you selected.
Mounting an ISO File on Windows 10
Once you’ve converted an IMG file to ISO, you can use it in several ways. For instance, if you want to use it to burn a DVD or flash USB media, you could do so. One way to make use of the file, however, is to mount it as a virtual drive. Windows allows you to do this without any additional third-party software in Windows File Explorer. To start, open File Explorer and navigate to the location of your converted ISO file. To mount it, right-click the file and select the Mount option.
If Mount isn’t visible, you may need to set the default app for handling ISO files as Windows File Explorer in Windows Settings first. Once mounted, Windows will create a virtual drive for your file, allowing you to view the contents as if it were a CD or DVD. If you want to unmount the drive at any point, right-click the virtual drive in File Explorer and press the Eject option.
The virtual drive will disappear, allowing you to move or make further changes to the source file.
Storing Files on Windows
IMG and ISO files are both useful archival formats that allow you to clone or emulate CDs, DVDs, and other types of external media. When you’re creating a bootable Windows 10 flash drive, for instance, you’ll typically need to flash an ISO file containing the Windows installation files to your external USB drive. You can also use ISO files to create a Windows 10 system image, backing up your files and settings in the process. If you want to secure these files, however, you may need to use a third-party compression tool like 7-Zip to encrypt them, especially if you’re thinking about storing them online.


![]()
