You can save a list of sources to reuse within the same document or new documents, fill in all the details you need with a helpful tool, and insert a bibliography at any time and in any spot. Here’s how it’s done!
The Word References Tab
For this task, you’ll be working with the References tab in Word which is the same area you’d use to create a table of contents. And there is a nice section in the ribbon on this tab called, you guessed it, Citations & Bibliography. You also have two convenient ways to add a list of sources. You can add them as you work through your document or add them all upfront and then insert them as needed. So, open up your Word document or create a new one and let’s begin!
Select Your Style
A good first step for citing sources and creating a bibliography in Word correctly is to select the Style in the Citations & Bibliography of the ribbon. As with college papers, professors usually require a specific style. By selecting this right from the start, sources will be formatted as they should be throughout your document writing process. Click the Style drop-down and select the one you want from the list. You’ll see the most common citation styles like APA, MLA, Chicago, and several others.
Cite New Sources as You Write
When you land on a spot in your document where you need to cite a source, the fun begins. Click the Insert Citation button and select Add New Source. You’ll notice that you can also choose to Add (a) New Placeholder. This is convenient if you haven’t gotten the details for your source yet but want to make sure you hold a spot for it.
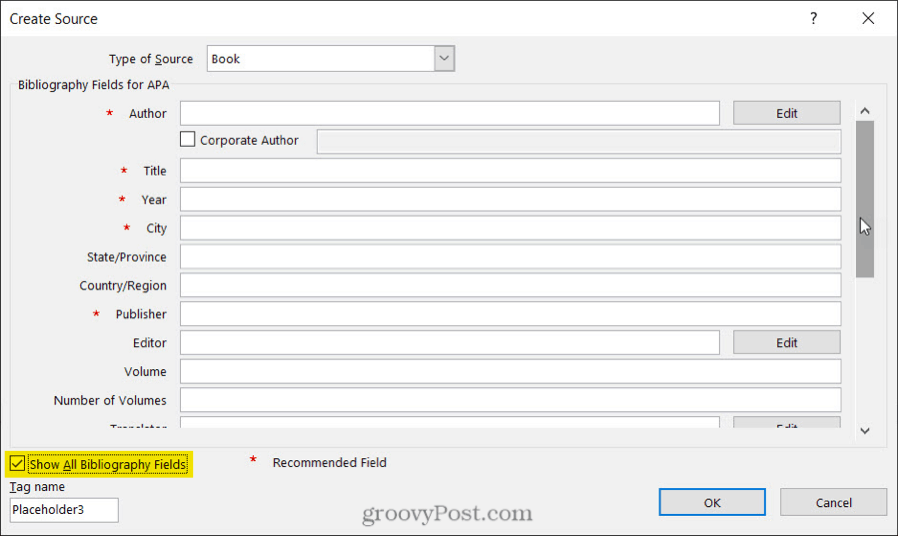
When the Create Source box opens, you’ll have everything you need to cite your source. Type of Source: Click the drop-down box and choose the source type from the list. You can pick from plenty of options like a book, website, article, patent, sound recording, and others. Bibliography Fields per style: Obviously the details for your source will vary depending on the type beyond the basic fields you need like title and author. You’ll have options for things like the URL of the website, the patent number for a patent, and the director for a film. All Bibliography Fields: Although you’ll be presented with the fields you need for the style you select you can also view All Bibliography Fields by marking that checkbox. Then, you’ll see red asterisks next to the recommended fields.
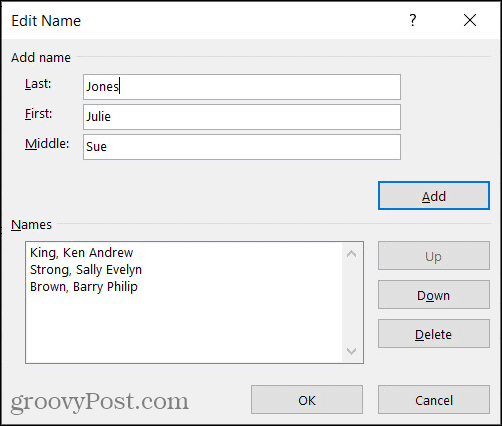
Adding More Details: You’ll notice that some fields have an Edit button next to them. This is helpful if you want to add more than one name to a field. Complete the Add Name fields for the first person, click the Add button, then complete the name fields for the next person. You can use the Up and Down buttons to place the names in the order you want them to display. Click OK when you finish.
Manage Your Sources
Once you begin adding sources to your document or if you prefer to add them all upfront, you can use the Source Manager. Click Manage Sources in the Citations & Bibliography section of the ribbon. When the tool displays, you’ll see the Master List on the left and your Current List on the right. Here’s how to work with the Source Manager.
The Master List contains all sources you have already added or that are built into Microsoft Word.The Current List contains all sources you have added to your current document.Select a source from the Master List and click Copy to move it to your Current List and vice versa.Choose any source and click Edit to make changes.Choose any source and click Delete to remove it.Select New to add a new source.
You can use the Search box at the top to find a certain source or the Sort drop-down list to sort sources by author, tag, title, or year. When you finish working with the Source Manager, click Close.
Cite Saved Sources as You Write
Any source that you see in your Current List in the Source Manager can be inserted into your document easily. So, once you add a source, you can reuse it with a couple of clicks. When you hit a spot in your document where you want to cite a source, click Insert Citation from the ribbon. You’ll see your Current List above the Add New Source option. Select one and it will pop right into your document.
Create an Updating Bibliography
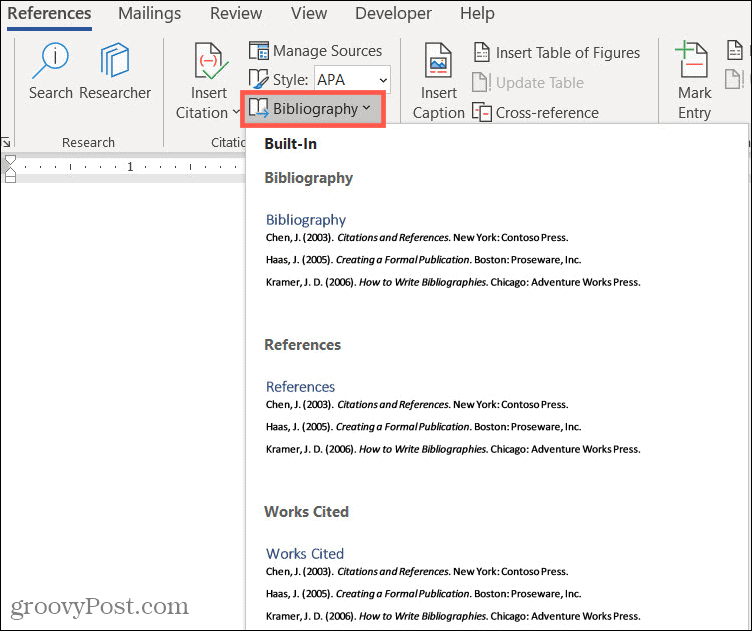
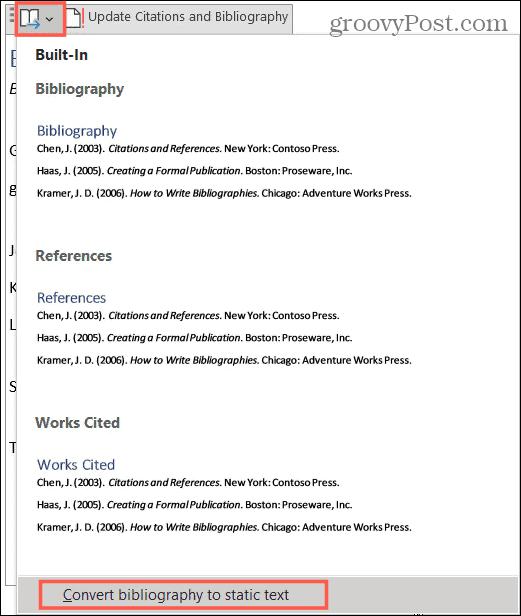
You can add an updating, built-in bibliography to your Word document before or after you cite your sources. This is handy because you can update the bibliography at any time with a click. Place your cursor where you want the bibliography and click the Bibliography button in the ribbon. Choose one of the Built-In options from the top: Bibliography, References, or Works Cited. You’ll see your bibliography pop into your document, formatting nicely, and exactly as it should be for the style you selected. Here are the actions you can take: On the top left of the bibliography heading is an arrow you can click to collapse and expand it. Above the heading, you’ll see a toolbar that lets you do the following.
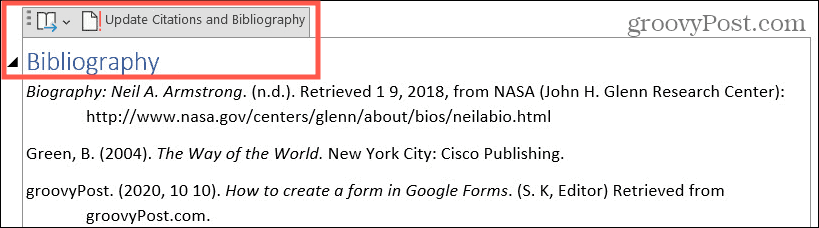
Three dots: If you click the three dots on the left of the toolbar, this selects the bibliography. You can use this if you want to delete it from your document or drag to move it.Bibliographies: Click this button to change the bibliography type or convert it to static text.Update Citations and Bibliography: Click this button to update the bibliography at any time. This allows you to continue citing sources in your document and add them to the bibliography automatically.
Use a Static Bibliography in Word
You’ll also see the option for Insert Bibliography at the bottom of the Bibliography drop-down list in the ribbon. In addition, you’ll see a Convert bibliography to static text option in the Bibliography toolbar.
Both options give you the same results:
The bibliography will not contain a header automatically.The bibliography will stop updating your Current List in the Source Manager.You can make manual changes to the bibliography if you want to deviate from Word’s built-in styling.
Never Forget to Cite a Source in Word
With the tools that Microsoft Word offers, creating a bibliography for your document is no longer a tedious task. Plus, you can cite and reuse saved sources quickly and easily! Looking for more help? Check out how to add and use custom dictionaries in Microsoft Word or how to add annotations in your next Word document.


![]()
