That’s because of the DPI of the image is low. What is DPI, though, and how can you check the DPI of an image on your PC? Here’s what you’ll need to know.
What is DPI?
DPI stands for Dots Per Inch. This is a term, originally from printing, that refers to how many printed dots there are in one inch of your printed document. It’s now a term used across computing to allow you to determine the quality and resolution of a photo or image. The higher the value, the more detailed and sharper your image will be. Images with higher DPI values can also be zoomed in much further before pixelation begins to occur. DPI is important when you’re printing images. If you want to create a large print of an image, you need to be sure that it has a high DPI. Otherwise, the image will look poor when you print it at a larger size. Even with small images, the higher the DPI, the better your image will look. This is especially true if you’re viewing the photo on monitors with a higher resolution, such as on the Retina displays of a newer-model Macbook Pro.
How to Check the DPI of an Image in Windows 10
If you’re on a Windows PC, you can quickly check the DPI of an image using Windows File Explorer. To do this, find the image you want to check in Explorer. Once you’ve found it, right-click the image and select Properties from the context menu that appears.
In the Properties window, click the Details tab.
You may need to scroll down until you find Vertical resolution and Horizontal resolution in the list of properties.
This will show you the DPI of your image. In most cases, the vertical and horizontal properties shown here will have the same value.
How to Check the DPI of an Image on a Mac
If you’re on a Mac, you can check the DPI of an image using the built-in Preview app. To do this, open the Finder file management app and navigate to the location of the file. You can then open the file in Preview by right-clicking the file and selecting Open With > Preview.
In the Preview window, click Tools > Show Inspector.
The image DPI will be shown as Image DPI in the information list provided.
How to Check the DPI of an Image in Photoshop
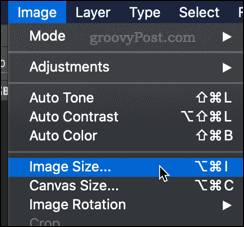
If you’re using Adobe Photoshop to manipulate an image, you can find the DPI using Photoshop’s built-in options. To do this, open the image in Photoshop. From the menu bar, click Image > Image size to open the Image Size dialog box.
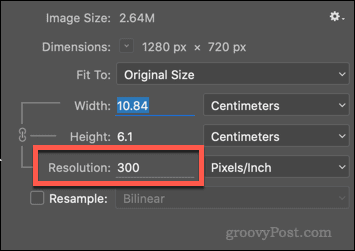
The image resolution will be listed as pixels per inch in the options bo provided, under the Resolution section.
If you want, you can change the resolution (and thus the DPI value) for your image using Photoshop from this menu. To do this, type a new value in the Resolution options box provided. If you don’t want the image size to change, make sure to uncheck the Resample checkbox before you apply the change.
Manipulating Your Images
Once you know the DPI value for your images, you can determine the right ways to manipulate them. A higher DPI should allow you to resize your images without losing too much quality, but this is harder to do for images with a lower DPI. There are other ways you could manipulate your images, however. For instance, you could use Photoshop to add filters and effects to your images. If they’re too big, you could resize your images using the Windows Photos app. If you want to crop your images, almost all photo editing tools should allow you to do this with ease.
![]()


