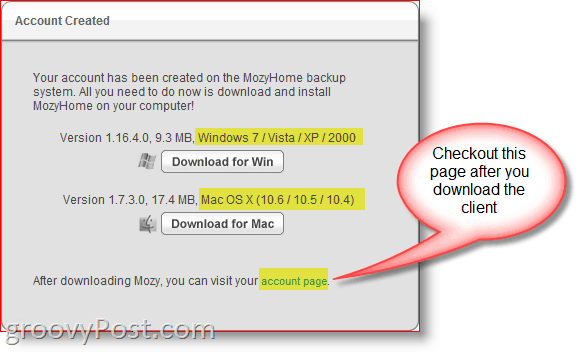
Over the weekend my sister called me in a panic. “I can’t get my computer to start! It has over ten years of Quicken history for my small business, and it’s not backed up anywhere! HELP!” Sound familiar? Hopefully not but the chances are if it hasn’t happened yet, it soon will. That’s because the statistics show that on average, over 140,000 hard drives crash every week and another 12,000 laptops are lost or stolen from airports each week as well. Fortunately for my sister, about a year ago when she invited us over for free tech support “dinner,” while I was cleaning the PC from a year’s worth of Virus buildup I decided to install a free copy of Mozy. We made a trip to Fry’s, grabbed a new drive and she was back up and running with no data loss. Happy ending. Who is Mozy? Ok, story time is over, and it’s time to get serious about home computer backup. The good news is it’s simple using the online “cloud” backup service Mozy.com. Mozy is an online “cloud” backup solution which provides 2 gigabytes of free online backup. Their backup agent is simple to install and configure. Why use Mozy to Backup my data? Although there are several other vendors out there that provide “cloud” backup, I like Mozy for several different reasons. Quick Overview of the Install and Config 1. My recommendation is to set up the free account with 2GB. If you like the service, you can always upgrade to a HOME account for the $4.95 flat fee w/unlimited backup. Mozy 2GB Free Download link 2. Setup your Free account and download either the MAC or Windows Client. Note: All screenshots taken from Windows 7
I recommend you take a look at the accounts page also. The accounts page is where you will configure where all your info stores, about how much data you have backed up, which computers are being backed up, upgrade your account, etc. 3. Press the typical Next, Next, Next until the install completes.
4. Begin the configuration wizard and re-enter your email address and password you set up during registration. Click Next when done.
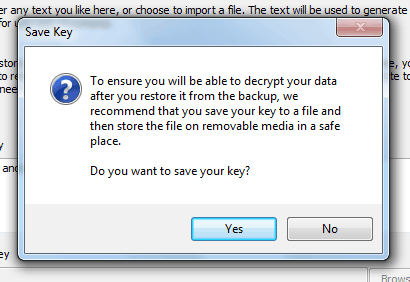
STOP! READ CAREFULLY! Ok, now you have a very critical choice to make. As mentioned above, (reason #3 for using Mozy.com) one of the great things about using Mozy to backup your data is the backup client will encrypt your data before it uploads it to the Mozy “cloud.” This encryption is a nice feature because this will ensure your data is never found on a backup tape in some warehouse somewhere or on a file server somewhere if the company ever goes bankrupt. Encryption at rest is GOOD. So, what you need to decide in Step 5 below is whether or not you want to use the Mozy encryption key OR your encryption key. Let me explain: Mozy Key The Good: Let’s say your computer gets stolen. No problem! Just log into Mozy, download the Mozy client, install it and begin a data restore. You don’t need to remember anything other than your Email Address you used with Mozy and your Password. The Bad: If at anytime Mozy wants to gain access to your account, all they need to do is reset your password on your Mozy account and log in as you and perform a restore. Why would they do this? Who knows. Perhaps you’re an enemy of the state (or accused) and a judge hands Mozy a subpoena might convince them to do it.?.?.? I have no idea. My point, however, is if Mozy wants to gain access to your files, they can. Now, if all your backing up is Quicken data or pictures of your kids, this is probably a good way to go. If however you’re a paranoid privacy groovyReader like me (just because your paranoid doesn’t mean they aren’t out to get you), you might want to go with the Personal Key option. Personal Key The Good: Using a personal private key that you generate (I recommend using a looooooong passphrase) means Mozy will not have the ability to gain access to your data easily. Should your data show up at a corporate bankruptcy auction on old hard drives or backup tapes, you should be good. The Bad: If your PC dies or gets stolen and you need to recover your data, after installing the Mozy client on your new PC/MAC you will be asked for that long and strong passphrase you used when you initially setup your account. If you can’t find it, or remember it, now you are done. Game over. There is no back door. Your data is pretty much gone forever. Personally, this is the route I always go; however, I have a process for not forgetting my passphrase which I’ll write about another time. (I would do it now, but it’s late, and I’m tired.) Granted, if you’re an enemy of the state or a terrorist, you probably should not use Mozy. My guess is if the CIA, NSA or PTA want to get at your data, a 256-bit AES key is not going to stop them. 5. Decide which method you want to use to protect your data and Click the radio button. In my example, I’m going to Click Encrypt my data with my personal 256-bit AES key.
6. After reading the WARNING again, Type in your Key. If you have an existing keyfile from a previous install, you can import it as well.
If you have a SAFE, Safety deposit box or Thumb Drive you keep on you at all times; then you can save the Key to your Hard Drive and copy it to your Thumb Drive for safe keeping. This process is an excellent option if you don’t want to risk forgetting your password. That being said, if you just leave it on your computer and the computer is lost or stolen, your PW is gone along with your data. 7. Decide if you want to save a copy of your keyfile. Click Yes or No.
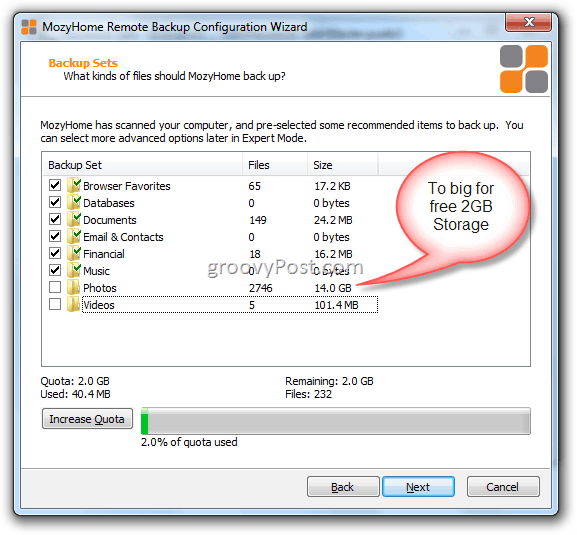
The Wizard will automatically scan your Hard Drive and create a backup job by grouping your files into Backup Sets. (Documents, Email, Financial Files, etc.) In my example below, I had to unselect my Photos because my free account allows for just 2 Gigs of data. That’s ok however because this backup is primarily being done just for my 16 Megs of Quicken data. 8. Confirm the initial backup looks accurate (and is under 2 Gigs) and Click Next
9. Mozy will perform a quick Upload Speed Test to verify your Internet connection is good enough for online backups. If you have a DSL line or better, you should be okay. Click Next.
If you have a slower computer, Mozy could cause interruptions when uploading new backups. To solve this, they allow you to adjust the slider bar to choose PC Performance Vs. Backup Speed. I recommend you leave everything at the default setting. 10. Click Next.
Now it’s time to start your first backup. I recommend you just leave everything at the default settings and initiate the backup. If you want to customize the settings later in expert mode, you can. For now, however, let’s just get a backup done to get your data safe. Like the “REMEMBER” note says below, if you’re backing up a few gigs, it could take a few hours or even days depending on your connection speed and amount of data your backing up. The first time I backed up my entire computer using the $4.95 plan, it took about two weeks because it was backing up about 400 Gigs of data. Yeah, I know. The good news is once the initial backup completes, future backups are very fast since only deltas or incremental backups are performed. 11. Click Finish
12. Nothing to do here but watch as your PC is backed up into the Cloud! Ahhh… I feel better all ready! Click Hide if the backup is going to take awhile.
When you minimize the backup, you can later access the Mozy app. by clicking on the Mozy Icon in your Windows Taskbar.
As mentioned earlier, per the above screenshot, Mozy will now keep track of any changes to your File and Folders. If you delete anything or add anything to your system, your PC/MAC will be kept in Sync with the “cloud” every 20 minutes or so.
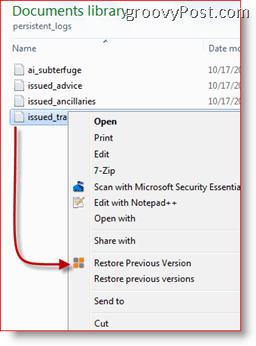
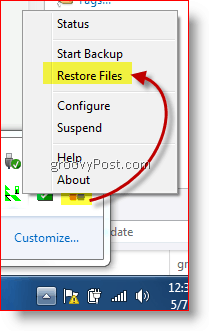
How To Restore Files with Mozy There are several different ways of restoring files you’ve backed up on Mozy. The easiest method is to just use Windows Explorer. Simply Right-Click on a Folder or File to gain access to the Mozy Restore feature in the Context Menu. From there it’s very straightforward to restore a version of the file. Tip: The Right-Click context menu is another great way to choose folders or files to be included in a future Mozy backup. Another way to Restore your Mozy backed up files is through the actual Mozy Client. Simply Right-Click the Mozy Taskbar Icon and Click Restore Files.
This action will launch the full Mozy client which will allow you to restore either the latest version of files or versions of files up to 30 days back.
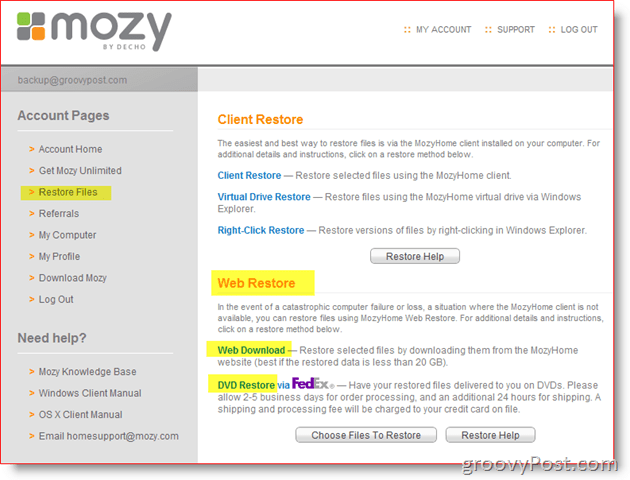
And of course, you can also restore files from the Web Browser AND Via Fed-Ex if you need to restore an entire Hard drive.
As you can see, the options are robust yet simple to navigate and use. Best of all, it’s 100% free. Now there are some additional “expert” features which I’ll cover at a later date, but I think for now the message should be pretty clear. BACKUP YOUR COMPUTER! If you still need some help, just let me know! Drop comments below or if you have a detailed question or problem, create a new topic in our Free groovy Forum! Mozy.com Free 2GB Backup Offer Mozy.com Unlimited $4.95 Monthly Flat Rate I’ve personally been running the $4.95 unlimited plan for about 2 years. Love it however it did have issues with Windows 7 when it was first realeased. The backup would start then hang. Now however, it’s working great. They must have updated something. What other services you talkin about? The fact that all of the data is encrypted makes it even more worthwhile. I also did a quick price check on all of the competitors, (ibackup, carbonite, intronis, sosonlinebackup) Carbonite does have a $4.50 USD per month plan that is unlimited but you have to pay a full year in advance! But when you do Carbonite vs Mozy, I think Mozy will be better just because their software is much easier to use and they have better support. Comment Name * Email *
Δ Save my name and email and send me emails as new comments are made to this post.


![]()
