Step 1 – Picking An Icon
OK, so in order for this to work you’ll need a flash drive or a USB External hard drive. Start off by picking an icon. The icon needs to be an .ico file with a maximum resolution of 256×256 pixels (Vista and 7). Tip – if you have a .png file and want to make an icon out of it you can use websites like ConvertIcon and ConvertIco (yes, it’s just 1 letter different but, the two websites are quite different).
Step 2 – Entering the Commands In The .INF File
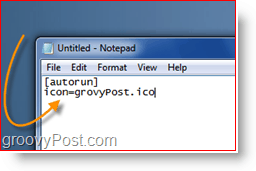
After you’ve got your icon ready we’ll need to create an .inf file that will give out the command to use the icon as your USB drive’s thumbnail. Go to Start > All Programs > Accessories > Notepad to open a new notepad window. From there you will need to Type in the following command into the Notepad window (see screenshot below): Write this command down and replace “groovyPost” with the filename of your icon. Warning – there must be no spaces in your filename in order for this to work.
Step 3 – Saving The File With A Custom Extension
Next, we’ll need to save the file as autorun.inf. From notepad, Click File, Save As
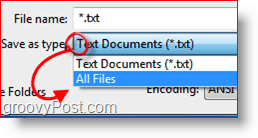
Select the type of file to be “All Files”. This allows us to enter a custom extension in the filename box.
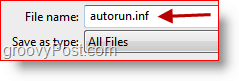
Change the filename to autorun.inf and Click Save Remember where you saved your file!
Step 4 – Copying & Pasting
Next up is to copy both files to your USB Storage Device. Note – both files need to be placed directly on the ROOT of the flash drive. Don’t put the files into any folders/sub-folders.onto the flash drive (not in any folders or briefcases) so that the autorun file does it’s job. In my case I’ve got an icon named groovyPost, so the second line of the command is “icon=groovyPost.ico”. Now let’s copy the files to the flash drive. Make sure both files are selected and then right click on one of them, picking “Copy” from the context menu.
Then go to My Computer and locate and open your flash drive. Then Right-Click on a blank white spot and Click Paste
Step 5 – Unplug & Plug
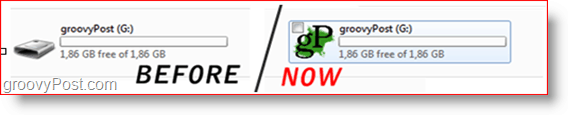
Unplug your flash drive and plug it in again. Your custom icon should show up.
That’s it! You’re done! It’s a fun groovy little trick that is BOUND to impress all your non-groovyReader Friends! I personally found the trick after I formatted my Western Digital External Studio Drive and lost the custom icon. Fortunately the trick is pretty simple and I was back up and running in no time! Comment Name * Email *
Δ Save my name and email and send me emails as new comments are made to this post.


![]()
