Windows 10
Microsoft hopes to have Windows 10 running on 1 billion systems within three years. An admirable goal, but one that does not take into account the requirements of the user. Windows 10 shares a lot in common with Windows 8.1; it is a smooth experience upgrading from that release. For Windows 7 users, the story might be a little different. Some older applications just work better with the older versions. If you purchase a new PC today, it likely will have Windows 10 preinstalled. Users still have an option, though, which is the ability to downgrade the installation to an older version of Windows, such as Windows 7 or even Windows 8.1.
Prerequisite Tasks you should Complete
Downgrading is an involved process; I strongly recommend you have everything in place before you start this project, such as:
Rollback Windows 10 Upgrade to Windows 7 or 8.1You Can Revert a Windows 10 Upgrade to Windows 7/8.1 but Don’t Delete Windows.old
The copy of Windows 7 or Windows 8.1 you want to downgrade. If you don’t have a license, you will have to purchase a Windows 7 or Windows 8.1 license. If your system came preinstalled with Windows 10 Pro, you’d need to download or borrow a Windows 7 Professional or Windows 8.1 Pro disc.A product key from a computer that is running Windows 7 Professional or Windows 8.1 Pro. If you are exercising downgrade rights from Windows 10 Pro OEM, this key can be either a retail upgrade, full version, OEM preinstalled, or System Builder product key.Necessary hardware drivers for either Windows 7 or Windows 8.1.External hard disk to back up your Windows 10 installation.Have a copy of your Windows 10 Pro OEM product key available, just in case Microsoft support needs to verify it during activation. Here is how you can find it. Please note, this is for OEM preinstalled Windows 10 Pro licenses only.
Press Windows key + X then click Command Prompt (Admin), at the command prompt, type the following command, then hit Enter on your keyboard. wmic path SoftwareLicensingService get OA3xOriginalProductKey
Other Options you should Consider Before Downgrading
For computers upgraded to Windows 10 from Windows 8.1 or Windows 7, a limited option is available within 30 days to roll back to your previous version. If your upgrade to Windows 10 is more than a month old, then a manual downgrade will have to be done. If your computer came with recovery media, consult the documentation for instructions on how to reinstall Windows 7 or Windows 8 on your computer. If you recently purchased a new computer, preinstalled with Windows 10, only to find out it does not work with your hardware or software, or you just don’t like it, then you might want to consider returning the computer. The hassle associated with actually downgrading is not as convenient and smooth sailing as you might believe. Also, there remains a demand for systems with older versions of Windows, which is what you might prefer. Most OEM vendors such as Dell, HP, and Lenovo offer new model systems with a choice of Windows 7 or Windows 8.1. If your computer is still within its warranty period, then I suggest you take advantage of it and purchase an appropriate system preinstalled with Windows 7 or Windows 8.1. Microsoft made available, a list of vendors who are providing a selection of Windows 7/8.1 systems with support for Intel’s latest CPU architecture, Skylake. Microsoft recently announced plans to limit Windows 7 and Windows 8.1 support for future revisions of Skylake. This would make now an opportune time to upgrade to a new PC while they are available. Within a year’s time, Microsoft will only focus on supporting Windows 10 on future processor technology.
Downgrade to Windows 8.1 or Windows 7
If you recently bought a system with Windows 10, but your purchase is outside the warranty window, then your next best option is to manually downgrade, if your system supports it. Here is what you need to do, to determine if you can successfully downgrade:
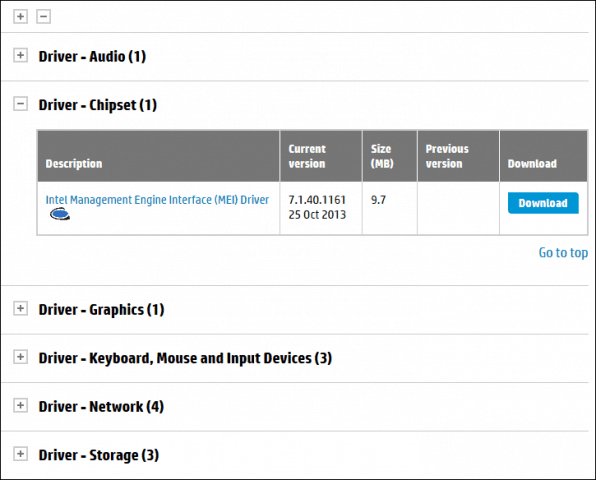
Check if the manufacturer has native Windows 7 and Windows 8.1 hardware drivers available; depending on the model system, it is not a guarantee they do. You will need important drivers such as Chipset, Video, Network, Audio, and Storage to have a working system.A Windows 7 or Windows 8.1 license. If you don’t have a license for Windows 8.1 or Windows 7, you will need to purchase one. If your system came preinstalled with Windows 10 Pro, then you are automatically entitled to downgrade rights to Windows 8.1 Pro or Windows 7 Professional.
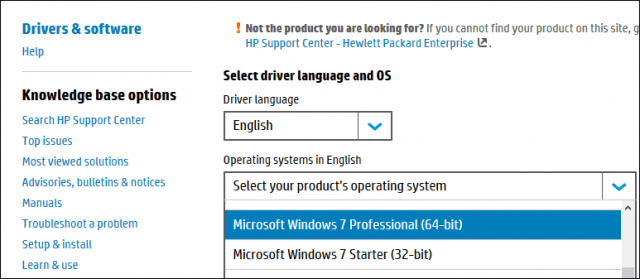
Go to the manufacturer’s website, and then look in the downloads and drivers section of the website. Enter the model number then click OK or Go.
Once your drivers have been found, the website will usually have an option to filter the operating system. Click in the list box, select Windows 7 or Windows 8.1 depending on which version you decide to downgrade. Proceed to download all the critical drivers such as Chipset, Video, Network, Audio, and Storage. After downloading, save them to a thumb drive until you are ready to install them.
Backup your Windows 10 System
You might not like Windows 10 today, or your trip back to Windows 7 might be temporary. In the future, if and when you decide to return to Windows 10, you can make it a convenient process for restoring a system image. This will, of course, be like performing a clean install, with minimal inconvenience. Check out our article for instructions on how to create a system image in Windows 10.
Choose the right edition and architecture of Windows 7 or Windows 8.1
You need to determine, the version and architecture of Windows 7 or 8.1, you will be installing. If your computer has more than 4 GB of RAM installed, use a 64-bit version. If your objective is compatibility with legacy hardware or software, then 32 bit will be your best choice, this will limit the amount of memory your system will be able to address. If you are exercising downgrade rights from Windows 10 Pro OEM, you can download a copy of Windows 7 or Windows 8.1 from the software recovery page. For Windows 7 media, you will need to have a valid product key. If you don’t, then the software recovery page will not work. Your next best option is to borrow a corresponding Windows 7 Professional disc from a trusted friend or family member.
Disable Secure Boot and EFI Boot then Prepare to install Windows 7 or 8.1
Installing Windows 7 or Windows 8.1 is a relatively easy process. Check out our articles for instructions on how to do so. The procedure involves performing a clean install. You can’t perform an in-place upgrade to an older version of Windows, from within Windows 10. Before starting the installation, you will need to disable Secure Boot and native EFI boot. This process is required if you are installing Windows 7. Also, disabling Secure Boot is necessary before enabling legacy boot.
Secure Boot was first introduced as part of the Windows 8 wave of systems featuring a new security mechanism for protecting systems from malware. Disabling Secure Boot might vary across system brands and models; the process will require booting into the system’s firmware interface. Check out the following TechNet article for instructions on how to disable Secure Boot.
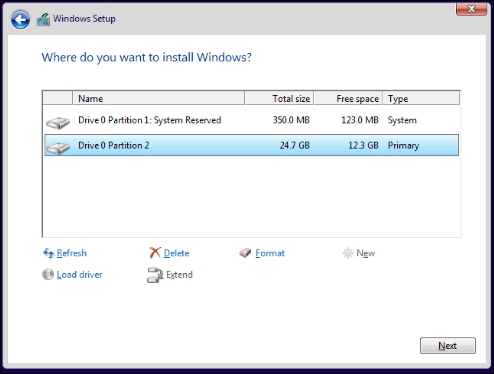
After booting from your Windows 7 or Windows 8.1 install media. Click the option Custom (Advanced), then select each partition, then click delete until there is only a single, unallocated disk. Click New; this will create a system recovery partition. Choose the larger system partition then click Next to install your version of Windows.
Install Hardware Drivers and Update Windows
After installing Windows 7 or Windows 8.1, proceed to install the appropriate drivers you had downloaded in advance. Start off with the most critical which include; Chipset, Video, and Network. Your Windows 8.1 and Windows 7 installations will likely be out of date, so immediately check Windows Update for the latest updates then install them. Also, ensure your Antivirus utility is updated. Windows 8.1 includes a built-in antivirus called Windows Defender. Windows 7 users can download Windows Defender or another free third-party Antivirus utility.
Activating your Windows 7 or Windows 8.1 License
Once you have Windows 7 or Windows 8.1 up and running, you will need to activate your license. Depending on the options chosen or available, this process should be smooth. If you had to purchase a retail or OEM system builder license, then standard Internet activation will be all you need to do. For systems utilizing downgrade rights through Windows 10 Pro, your options are tricky. According to Microsoft, you should contact the OEM about obtaining a license. Some OEMs pre-inject the product key for Windows 7 Professional or Windows Vista Business into the BIOS for just such an occasion. If your OEM did this on your PC, you have to take only one of the following actions:
Install Windows 7 Professional or Windows Vista Business by using the recovery media for that version of Windows that was provided by the same OEM. Your system will activate automatically by using the product key that was injected into the BIOS. source
If your OEM has not injected your product key into the BIOS on your PC, follow these steps:
Obtain genuine Windows 7 Professional or Windows Vista Business installation media and the corresponding product key. You may have to buy a full-package product copy of the Windows downgrade from a retailer. source
These statements defeat the purpose of downgrade rights. The workaround in this situation is to use an existing Windows 7 or Windows 8.1 Product Key to initiate the activation. The tricky part of this is, it can be a product key that is already in use but corresponds with the edition. The burden is on you the user to find such a product key. Options include borrowing a Windows 7 Professional/Windows 8/8.1 Pro key from a trusted friend or family member. The intention is not to use the key to activate the license but to exercise downgrade rights itself. You can also use a product key from a computer preinstalled with an OEM Windows 7 Professional or Windows 8/8.1 Pro license. See instructions at the beginning of this article on how to extract a Windows 8.1 Pro product key through the command line. Press Windows key + R then type, slui.exe 4 then hit Enter on your keyboard. Select your country from the list box, choose the Phone Activation option. Stay on the phone, then wait for a Microsoft Answer Tech to help you with activation. The most important thing you need to remember to say is “I am exercising downgrade rights.”
Disable Get Windows 10
Since you are now back on a qualifying version of Windows, you will get the notification to upgrade to Windows 10. Check out our articles here and here, for how you can disable the Get Windows 10 app from automatically upgrading your computer to Windows 10. When you do decide to upgrade to Windows 10 again in the future, you can choose the in-place upgrade route, or restore the system image you had created in advance. If you have accumulated data on the system, back that up first, then restore the system image. Phew, now that was a lot to articulate. Microsoft wants every PC to upgrade to Windows 10; the reality is that can only happen in a perfect world. We all have our various reasons why we still prefer Windows 7 or Windows 8.1; it is our right. Windows 10 is indeed the future, but I am sure many of us would prefer to embrace the future on our terms. Yes you can -Andre Back to my problem. I read that I should return these computers and get new ones with Windows 7 but that is not an option. Please send me directions on setting these up on Windows 7. http://www.classicshell.net/ This will make Windows 8.1 look like Windows 7 but work like windows 8. what is far far better tahn windows 10 or 7. The read Tweakhound 8.1 and you are set. https://tweakhound.com/2013/10/22/tweaking-windows-8-1/ Better if you make a partition of C: first. This is the only useful use of your preinstalled windows 10. This is the best alternative. Period. wmic path SoftwareLicensingService get OA3xOriginalProductKey …..AND THEN?????????????? Y8A65EA – HP ProBook 450 G4 – Intel Core i5-7200U, 4GB 2133MHz DDR4 1D, 500GB 7200rpm, 15.6″ HD SVA AG (1366×768), DVD+-RW, Numpad, FPR , Intel AC (2×2) +BT, Win 10 Pro 64, 1-1-0, SEA. Can you please advise? Thanks Any suggestions on how to work my way around this!? Installation through boot up does not accept any of my product keys. all I get is the error msg, and it is immediate ” Unable to verify the product key. Check installation media” Is this an issue with dell or microsoft. And i have tried to get help from both sides.. Help from microsoft and its online assistants, sends me around in a circle which brings me back to the same issue. And Dell SA are completely useless. All I am hoping for is Windows 10 gone, and 8.1pro installed and working. If only the drive changed, Windows shouldn’t even ask you for re-activation. Comment Name * Email *
Δ Save my name and email and send me emails as new comments are made to this post.


![]()
