TechSmith originally won my heart with SnagIt, the hands-down best screen capture tool and editor I’ve ever encountered. But they solidified their status in my eyes as favorite thing in the world when I was introduced to Camtasia Studio. The thing I like about TechSmith as a company is that they include convenience features in their products that I would never have thought of, but once I know they exist, I can’t live without them. The latest version is Camtasia Studio 7.1, so if you’ve previously been turned on to Camtasia Studio 6, then you should already know 7.1’s main selling points. But if you’re considering investing in an upgrade, here are the reasons you should:
Faster, more efficient editing and sharingThe Library feature lets you save callouts, title slides or entire sequences and reuse them throughout your project. This saves you editing time, but more importantly, introduces more consistency in your final product.Copy and Paste has been improved, allowing you to reuse transitions, zooms and effects throughout your timeline.YouTube Upload lets you upload videos straight to YouTube without leaving Camtasia Studio.SmartFocus has been improved.Enhanced callouts and effectsTransparent callouts add style and clarity to your presentations.Automatically generate Keystroke Callouts to show a button presses as a graphic overlay (can also display custom keystroke callouts).Enhanced Cursor Effects highlight the pointer and show left- and right- mouse-clicks.Sketch Motion Callouts call attention to items on the screen with “hand-drawn” animations.Improved usability and accessibility in final product508 compliant Caption Support with the ability to import/export caption files.Speech-to-Text Transcription using Windows Speech Recognition makes captioning a breeze.Searchable Videos uses overlay controls to jump to points in the video based on captions.
Beyond these points, TechSmith gave Camtasia Studio 7.1 a visual makeover, an optimized screen recorder and 64-bit codec support. But for those of you who are completely new to Camtasia Studio, you should check out the full tour of Camtasia’s outstanding features below.
Video Capture and Screen Recording
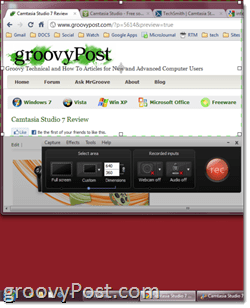
Screen capture and video editing are the meat and potatoes of Camtasia Studio 7, and both features are hearty and fulfilling. There are three ways to get video into your timeline: recording the screen, importing video clips and recording from your webcam. The screen capture interface consists of a record button along with a selector for your dimensions. You can draw a custom-sized box around the area of the screen you want to capture, but the best way to choose your capture size is from the 16:9 or 4:3 presets—these help ensure that your produced video fits the intended medium (YouTube, iPad, HDTV, etc.). You can, of course, capture the full screen area as well. Concurrently to recording the screen, you can also capture narration through a built-in microphone or attached device (I use my Zoom H4N). Or, you turn audio off and add narration later. Lastly, you can turn on your webcam to include yourself talking as a Picture-in-Picture video. After you capture a clip, you can choose to delete the take and do another, which is handier than you’d think, or you can save it and open it in the timeline editor or you can produce it and share it immediately. Camtasia saves clips in its proprietary .camrec format, which includes data such as key presses, mouse-clicks and other information other than video. This allows you to add/remove mouse-click sounds, cursor effects and keyboard call-outs later. Overall, Camtasia Studio 7.1’s screen capturing is incredibly smooth. Granted, much of it will be dependent on what you’re screencasting (web pages will go smoother than a Blender tutorial) and what your machine can handle, but I have yet to experience any significant lag, delay or choppiness on my Core 2 Duo Macbook with 4 GB of RAM.
Editing Videos and Screen Recordings
The real fun and magic happens during the video editing phase. I’ve read here and there that Camtasia Studio has a learning curve, but honestly, it only took me an afternoon to get comfortable in the editing suite. Granted, I have some experience with Final Cut Studio and Cakewalk, but I think anyone who has ever worked on a timeline-based, multi-track recording suite (i.e. Garageband) will be able to get their bearings very quickly. The screen is divided into three main sections: the special effects window, the timeline and the preview window. These elements are mostly self-explanatory. You’ll be doing your temporal editing in the timeline, by dragging and dropping, resizing and splitting and cutting clips. You can add special effects and other visual elements in the special effects pane and see them in the preview pane.
Timeline
Everything that shows up in your video lives on the timeline, including audio, callouts, zoom-n-pan keyframes and video clips. You can edit the length of each item by double-clicking it in order to open it up in the special effects pane. Or, you can click and drag on its edges to resize it (i.e. change its duration). The Playhead sits above the timeline and tracks to the position in your video. The preview window shows you where you are in the video according where the Playhead is set. On either side of the Playhead are a red and green tab, which you can move around to select a section of your video. You can also zoom in and zoom out of your timeline using the slider between the two magnifiers. For audio tracks, you also get the volume pan, where you can add audio points to fade in/fade out. You get a total of three audio tracks, plus a picture-in-picture audio track.
The most common task you’ll likely be performing on the timeline is splitting. This divides both the video and audio clips on the timeline into two parts, allowing you to move them around, apply effects and edit them separately. Splitting is the best way to remove unwanted portions of your video—simply clip the end and drag the duration to remove the part you don’t want. TIP: If you want to split a video track but not the corresponding audio track or vice versa, simply lock the track before splitting. Overall, the timeline is what you’d expect from a professional editing suite. It’s not quite as robust as what you’d see on ProTools or Final Cut, but you’re not going to be producing feature films or platinum albums on here. The Camtasia Studio timeline has everything you need and nothing you don’t, which makes temporal editing easy and frustration free. My one complaint: there’s no easy way to combine or join clips after splitting them. This is a drag when applying zoom-n-pan and callouts, since you have to add the effects for each split clip.
Zoom-n-Pan
I really enjoy Camtasia’s zoom-n-pan feature, both in terms of editing and the final product. The timeline has a separate zoom-n-pan track where you can plot your keyframes, but adding them is much easier than you’d think. You can simply playback your video with the zoom-n-pan tab open in your special effects pane and pause it whenever you get to a point when you want to zoom in. Then, size the box to the area you want to zoom in on in the little inset in the special effects pane. You can choose the duration of the zoom, depending on how epic you want your zoom or pan to be. This creates a “tail” on the keyframe, to show you where the zooming starts on the timeline. If you want, you can also tilt the screen horizontally up to 45 degrees, but I’m not entirely sure why you’d want to do this.
But of course, the easiest way to apply zoom-n-pan is to allow SmartFocus to take care of it for you. SmartFocus analyzes your clicks, typing and window focus while you’re capturing and detects where it should zoom. I’ve found that SmartFocus gets it right about 90 percent of the time—and for the times it can’t accurately guess exactly what it is you want, you can always adjust it manually. Bottom-line: Camtasia’s zoom-n-pan is easy to use and makes the end product about 110 percent more professional-looking.
Callouts, Captions and Cursor Effects
Nothing beats a good visual to drive a point home, and TechSmith lavished a lot of attention on allowing you to make crystal clear points with callouts and captions. Caption support, as I mentioned above, is relatively new to Camatasia Studio and supports speech-to-text and accurately pegs the text to the time in the video. This is an important feature for anyone who plans on making their videos localized.
Callouts let you add arrows, text boxes, speech bubbles, keystrokes, sketch motions, highlights, blurs and spotlights to your video. If you’ve seen any of the screencasts I’ve posted here on groovyPost earlier, you’ll know that I use these liberally (perhaps too liberally). Used correctly, they add a lot of depth to your video. You can customize the look and feel of each one, including the colors, font, outlines, shadows and other effects. For sketch motions, you can choose how long it takes to “draw” them on the screen. And for all callouts, you can tweak how long it takes to fade in/fade out. Again, Camtasia Studio puts a little “tail” on the front and end of the items on the timeline, so you can see when they start fading in/fading out. This is important for making sure that your callouts aren’t still hanging out when you start zooming or panning. The keyboard shortcut callout is particularly handy, as it allows you to show viewers what you’re doing on the keyboard. These can be inputted manually or generated from the .camrec file. You can also import an image as a callout. This is what I use to insert the groovyPost logos into the title slides, but you can get creative with it, too. For example, in my Photo Fuse tour, I used image callouts to create an illustrative quasi-animated diagram to preface the tutorial.
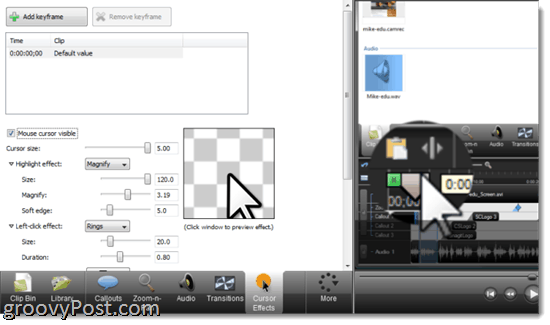
I’m lumping cursor effects into this section because like callouts and captions, it adds to the visual clarity of a presentation. For .camrec files, you can magnify the cursor up to 5 times, highlight, magnify or spotlight the area around the cursor and add click effects, such as rings, ripples or “warps.” You can choose a different effect for right and left clicks and customize them. You can also add artificial right and left click sound effects. Remember: these are only added to .camrec files, where the mouse and keyboard input data is embedded. You can’t add cursor effects to .AVI or .WMV files, for example. You can also choose to hide the cursor.
Transitions and Title Clips
Aside from video clips, you can add title clips and transitions. Transitions and title clips get plotted on the timeline just like everything else, but transitions can only be added between clips. There’s a nice selection of transitions, from classics like fade in and flip to more quirky transitions, like spiral and zig zag. You add them by dragging and dropping them between clips in the transition tab. You can change their duration as well.
Title clips behave similarly. You can shove them between clips or at the end or beginning of your project and customize the duration. You can choose your font and the usual basic formatting, such as italics, underlining and bold as well as alignment. You can also choose your font and change the text and background color, or add a background image. Adding callouts can really snazz up your title clip with sketch motions and images. You can even zoom and pan on title clips and transition in or out of them.
Additional Features: Voice Narration, Quizzing and Picture-in-Picture
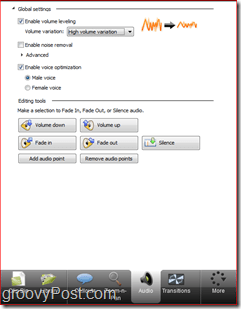
The remaining tabs on the special effects pane are less robust, but still useful. If you didn’t record the narration while shooting the video, you can add it in later in the voice narration tab. Here, you can adjust your levels and choose which track to record to. The audio setup wizard makes it easy to switch between input devices. I’m not a huge fan of how Camtasia asks you to save each and every take as a separate .WAV file—I’d much rather it handle that all “internally” like Garageband does. But overall, the narration feature does everything it should without forcing you to import narrations, though you could if you wanted to by clicking the Import Media button. The quizzes and surveys feature lets you collect feedback with a Flash survey. However, in order for these to work, you have to embed your video as a Flash presentation. Picture-in-Picture is used chiefly to include a little inset of your beautiful smiling face as you explain your software or tutorial. But you can also embed other video files, like I did in my video for my RTM iPhone shortcut script. You can move the picture-in-picture video around and it just sits on top of your main video. Somewhat useful, but what I’d really like to see is some kind of split-screen support. But that’s not really PiP’s intended purpose. The best way to use PiP is to shoot a video of yourself on your webcam while capturing your screen to add that personal touch to your screencasts. Make sure to comb your hair first, though.
Library and Clip Bin
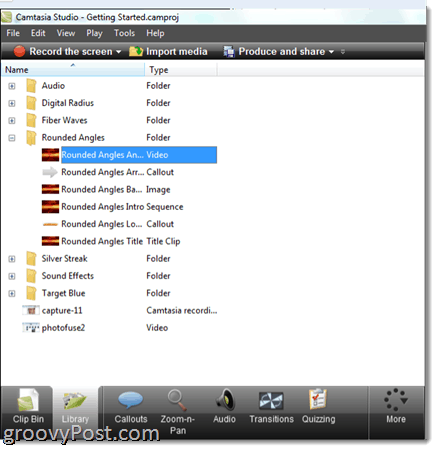
The Library is highlighted as a key new feature for Camtasia Studio 7, but I admit I don’t use it very often. That doesn’t mean that it’s useless—it just means that I’m probably not tapping the full potential of Camtasia Studio by ignoring this feature. Essentially, the Library is a collection of frequently used clips, callouts, transitions, title clips and audio tracks that you can drag and drop into your timeline when you need them. For example, I should probably using the Library to store my title clips, so I don’t have to make them from scratch with each video I make. I should also use it for pre-formatted callouts, so my callouts always have the same font, colors, etc. Not only would this save me time, it would make the look and feel of my screencasts more consistent.
The Library comes pre-loaded with some animations, callouts, sound effects and audio tracks, but you can build up your own Library with your own frequently used elements. This is different from the Clip Bin, which is specific to your project and includes all the video clips, narrations, title clips, etc. for the project you have open. The Library is constant across all your projects, which allows you to use the same title clips and transitions for the video you made this afternoon as you did for the video you made last week.
Exporting, Producing and Sharing
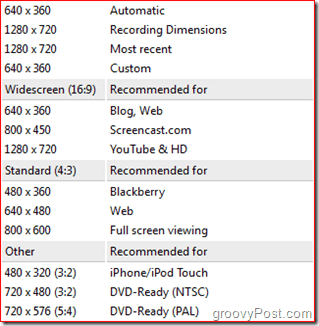
When you’re all done editing and you’re ready to share your masterpiece with the world, you’ve got lots of options. Camtasia has quite a few resolution/encoding quality presets for all the common outputs, such as YouTube & HD, BlackBerry and iPhone/iPad and DVD. TechSmith also has their own screencast hosting service called ScreenCast.com, which obviously plays nicely with Camtasia Studio. Under the Produce and Share menu, you can choose to zap your video right to YouTube or ScreenCast.com after entering your login credentials. Exporting with the other options is as easy or as complicated as you want it to be. You can be whisked through the wizard dialog or you can customize and tweak the settings for your MP4, FLV, SWF, WMV, MOV, AVI, M4V, RM, CAMV, MP3 (audio only) or GIF (animation file) file. You can even mix down separate video and audio files, if you want to do further editing in another program. The preview function lets you see a snippet of your video with your chosen settings so you don’t have to wait an hour for your project to render just to find out that the colors are all wrong. But for all the advanced features, what’s really valuable to me, and likely to you, are the recommended presets. I don’t know about you, but I haven’t memorized the resolutions and other settings that are preferred by YouTube, iPod Touch, etc. This saves you a lot of trial and error and re-rendering.
Conclusion and Summary
Camtasia Studio 7.1 is one of my favorite programs to use. I think the value of this program is its inclusiveness, it’s wide range of features and its ease of use. And for that, you’ll pay a high price: $300 per license. I think that’s worth it. If you’ll be using Camtasia Studio for it’s intended purpose, you’ll be using it to earn money, either for your blog, training employees, creating online tutorials or by promoting your own software. And for all of those applications, presentation matters. Not only that, the amount of time you’ll save using Camtasia Studio versus juggling a variety of free or less expensive products will help Camtasia pay for itself. If you’re upgrading from a previous version, it costs $149.99. Education pricing for Camtasia Studio is $179 a pop, or $89.50 for an upgrade. Overall, Camtasia Studio 7.1 has an incredible set of features, most of which are absolutely vital to creating professional screencasts. But in spite of the pro look of the end product, the software is as easy to use as Garageband.And for those who are new to multi-track timeline editing, TechSmith provides a wealth of tutorials, sample projects and demos to help you get acclimated to the environment. In my opinion, there is no cheaper or free alternative to Camtasia Studio. There are free video editing suites, such as Windows Live Movie Maker and iMovie, and there are free screen capture tools, such as ScreenToaster. But none of these combine the features and usability of Camtasia Studio with equal slickness and power. The closest to a free alternative to Camtasia Studio is Jing or Jing Pro, which are also made by TechSmith and are more leveled at casual and hobbyist users. But for professional quality screencasts, Camtasia Studio 7.1 is the only choice in its price range and below. Check out Camtasia Studio 7.1 for yourself with a 30-day free trial. You guys should do a give away contest! Comment Name * Email *
Δ Save my name and email and send me emails as new comments are made to this post.
